Sunday, December 28, 2014

PowerShell: Enable PSRemoting Remotely

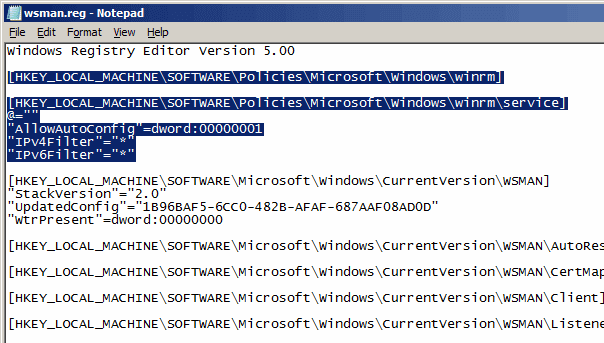
If you encounter a Windows 7+ domain computer without PSRemoting enabled, there is a way to enable PSRemoting without disturbing the user -- as long as you have local administrator rights on the target computer.  The Enable-PSRemoting command alters two registry key sections.  Extracting these keys from an accessible computer then importing them into the target computer is how we will enable PSRemoting.

Start by exporting the registry keys on a known working computer.  Use Regedit to export the following keys:

  • HKLM\SOFTWARE\Policies\Microsoft\Windows\winrm\service
  • HKLM\SOFTWARE\Microsoft\Windows\CurrentVersion\WSMAN


Edit each of the exported .reg exported registry files and combine the key information.  Your goal is copying this combined file into the target computers' c:\windows\system32 folder so it can be imported on that computer. Save the file into a network shared location.


Now we need to copy the file onto the target computer.  It must go into the same folder as reg.exe -- which is the c:\windows\system32 folder.  I unsuccessfully tried numerous ways of getting reg.exe to import via a network share.  The only way it would work was to have the registry import file in the same location as the exe.

start-bitstransfer \\server\share\wsman.reg \\$computername\c$\windows\system32 -credential $creds

Next we call on the WinRM service to do our bidding.  First we ask it to start reg.exe process to import the registry file then we'll restart the WinRM service.

invoke-wmimethod -name Create -enableallprivileges:$true -computername $ComputerName -credential $creds -Class Win32_Process -argumentlist "reg.exe import c:\windows\system32\wsman.reg"

invoke-wmimethod -name Create -enableallprivileges:$true -computername $ComputerName -credential $creds -Class Win32_Process -argumentlist "net stop WinRM"

invoke-wmimethod -name Create -enableallprivileges:$true -computername $ComputerName -credential $creds -Class Win32_Process -argumentlist "net start WinRM"

Now test your PSRemoting ability by using:

invoke-computer -computer $computer -credential $creds -scriptblock {get-date}

You've now enabled PSRemoting on the target computer.

Sunday, December 21, 2014

PowerShell: Using SNMP for HTML Network Printer Report

Managing network printers scattered throughout numerous locations is challenging when ensuring each location has replacement ink at the appropriate time.  A stopped printer loses production time and so there should be an easy way to capture current information about all network printers in a easy-to-use/share format.  As HTML is accepted by any computer and device, I thought it'd be best to use that format.

I've been searching for a way to aggregate the printers websites in order to create a solution but that didn't work so I wondered if I could pull information via a "public" SNMP connection using PowerShell.  After many online searches, I found someone calling on the ComObject ole.Prn.OleSNMP.  

$SNMP = new-object -ComObject olePrn.OleSNMP


The SNMP object has a slight variation of the standard SNMP syntax.  The GetTree function is AKA SNMPWalk to those familiar with SNMP commands.  

$snmp.open("192.168.0.28","public",2,3000)
defined: (IP,account,how many attempts, how long before timeout)


Once connected, use the GetTree to find out information about the area you want in your report.  In my example, I'm querying for the maximum volume of toner.

$snmp.gettree("43.11.1.1.8.1")

The OIDFromString function converts a name to its OID location.


For instance:

$snmp.OIDFromString(".iso.org.dod.internet.mgmt.mib-2.system.sysDescr")


To capture an object:
$printertype = $snmp.Get(".1.3.6.1.2.1.25.3.2.1.3.1")

Since SNMP is a standard, most objects are in the same location across vendors. One area I found variance is the toner/waste container location. In printers with only one toner cartridge and no waste container, it's a standard:

$tonername = $snmp.get("43.11.1.1.6.1.1")
$tonercapacity = $snmp.get("43.11.1.1.8.1.1")

$currentvolume = $snmp.get("43.11.1.1.9.1.1")

Example of multi-cartridge printer (notice the last digit):

$blacktonercapacity = $snmp.get("43.11.1.1.8.1.1")
$blackcurrentvolume = $snmp.get("43.11.1.1.9.1.1")
[int]$blackpercentremaining = ($blackcurrentvolume / $blacktonercapacity) * 100 
$cyantonervolume = $snmp.get("43.11.1.1.8.1.2")
$cyancurrentvolume = $snmp.get("43.11.1.1.9.1.2")
[int]$cyanpercentremaining = ($cyancurrentvolume / $cyantonercapacity) * 100
$magentatonervolume = $snmp.get("43.11.1.1.8.1.3")
$magentacurrentvolume = $snmp.get("43.11.1.1.9.1.3")
[int]$magentapercentremaining = ($magentacurrentvolume / $magentatonercapacity) * 100
$yellowtonervolume = $snmp.get("43.11.1.1.8.1.4")
$yellowcurrentvolume = $snmp.get("43.11.1.1.9.1.4")
[int]$yellowpercentremaining = ($yellowcurrentvolume / $yellowtonercapacity) * 100
$wastetonervolume = $snmp.get("43.11.1.1.8.1.10")
$wastecurrentvolume = [math]::round([math]::abs($snmp.get("43.11.1.1.9.1.10")))

[int]$wastepercentremaining = (($wastecurrentvolume / $wastetonercapacity) * 100)

Amongst the printers, all have their error status location in the same OID.  Here's how I filtered my printers:

$statustree = $snmp.gettree("43.18.1.1.8")
$status = $statustree|? {$_ -notlike "print*"} #status, including low ink warnings

$status = $status|? {$_ -notlike "*bypass*"}

That's the basics to extracting printer information via SNMP.  Here's how to explore your printers information using the free SNMP software which helped me out.
http://www.manageengine.com/products/mibbrowser-free-tool/

Clear out all the MIBs in the module area then File, Open the Printer MIB.
Once the Printer MIB has been loaded, start exploring by opening the tree and finding an area of interest.  Right click on the folder and select SNMPWALK.
Here's an example of results of an OID folder search.
If you right-click on the folder and select "MIB Description", it'll give the OID location.  Notice the .1.3.6.1.2.1.43.1.1, that will be used in your script.
Here I've copied/pasted the OID into my command line.  Notice the difference between the GUI and command line.  It's easy to navigate once you get to figuring out the structure.

Once you've found the SNMP information you'd like to report about, then it's time to build an input file and script.  This is how I've built my solution, obviously there are several other methods to extracting and reporting this information.

Input text file (printerlist.txt):

192.168.0.236,PX_SPS_FIN_BW,Finance Printer
192.168.0.237,PX_SPS_FP_COLOR,Forest Practices
192.168.0.238,PX_SPS_MFC1,Main Color Copier
192.168.0.254,PH_SPS_PLT,Plotter
-Mineral
192.168.1.250,PX_MIN_BW
192.168.1.235,PX_MIN_MFC

Here's my script so you can download and customize for your use:

What you'll see when running the report (note that the printer names are coming directly from SNMP):


Script:
(By the way, I style my PowerShell scripts as if they were DOS batch files.  I've been writing scripts since DOS 5.0/Novell 3.x using DOS Edit and Windows Notepad.  Some habits are hard to break so thus this script is not in the typical PS script layout.)
In this example, I only give one printer 'if' statement.  You'll have to use the $printertype = $snmp.Get(".1.3.6.1.2.1.25.3.2.1.3.1") to gather printer type information for your 'if' statements:

$printerlist = import-csv .\printerlist.txt -header Value,Name,Description
$outfile = .\Printers.html
$SNMP = new-object -ComObject olePrn.OleSNMP
$total = ($printerlist.value|? {$_ -notlike "-*"}).length

Write "`
<html>`
<head>`
<title>Printer Report</title>`
<style>* {font-family:'Trebuchet MS';}</style>`
</head>`
<body>"|out-file $outfile

write "Reporting on $total printers"
$x = 0

foreach ($p in $printerlist){

if ($p.value -like "-*"){write "<h3>",$p.value.replace('-',''),"</h3>"|add-content $outfile}

if ($p.value -notlike "-*"){

$x = $x + 1
$printertype = $nul
$status = $nul
$percentremaining = $nul
$blackpercentremaining = $nul
$cyanpercentremaining = $nul
$magentapercentremaining = $nul
$yellowpercentremaining = $nul
$wastepercentremaining = $nul

if (!(test-connection $p.Value -Quiet -count 1)){write ($p.value + " is offline<br>")|add-content $outfile}
if (test-connection $p.value -quiet -count 1){
$snmp.open($p.value,"public",2,3000)
$printertype = $snmp.Get(".1.3.6.1.2.1.25.3.2.1.3.1")
write ([string]$x + ": " + [string]$p.Value + " " + $printertype)
}

if ($printertype -like "*WorkCentre 5655*"){

$tonervolume = $snmp.get("43.11.1.1.8.1.1")
$currentvolume = $snmp.get("43.11.1.1.9.1.1")
[int]$percentremaining = 100 - (($currentvolume / $tonervolume) * 100) 

$statustree = $snmp.gettree("43.18.1.1.8")
$status = $statustree|? {$_ -notlike "print*"} #status, including low ink warnings
$status = $status|? {$_ -notlike "*bypass*"}
$name = $snmp.get(".1.3.6.1.2.1.1.5.0")
if ($name -notlike "PX*"){$name = $p.name}

write ("<b>" + $p.description + "</b><a style='text-decoration:none;font-weight:bold;' href=http://" + $p.value + " target='_new'> " + $name + "</a> <br>" + $printertype + "<br>")|add-content $outfile
if ($percentremaining -gt 49){write "<b style='font-size:110%;color:green;'>",$percentremaining,"</b>% black toner<br>"|add-content $outfile}
if (($percentremaining -gt 24) -and ($percentremaining -le 49)){write "<b style='font-size:110%;color:#40BB30;'>",$percentremaining,"</b>% black toner<br>"|add-content $outfile}
if (($percentremaining -gt 10) -and ($percentremaining -le 24)){write "<b style='font-size:110%;color:orange;'>",$percentremaining,"</b>% black toner<br>"|add-content $outfile}
if (($percentremaining -ge 0) -and ($percentremaining -le 10)){write "<b style='font-size:110%;color:red;'>",$percentremaining,"</b>% black toner<br>"|add-content $outfile}
if ($status.length -gt 0){write ($status + "<br><br>")|add-content $outfile}else{write "Operational<br><br>"|add-content $outfile}
}
}
}

write "</body></html>"|add-content $outfile

&$outfile

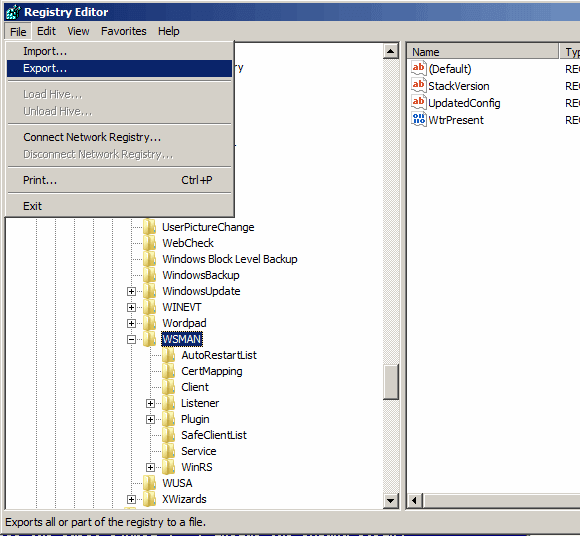
Sample output:


Thursday, September 18, 2014

50 Top Scientists of Twitter

Want some great information by those making a difference in their respective scientific fields?  Then follow some or all of these great people listed by AAAS.ORG:


Wednesday, March 26, 2014

PS1X + DareCup = Browser-based DameWare Remote Access

I've been developing a PowerShell-based website with software created by www.powershellserver.com.  The product is PowerShell ASP and is a combination of PowerShell, ASP, and HTML.  It's great for aggregating data from SharePoint, SCCM, PC's via RWMI, and various intranet sites and spreadsheets.  I recently pulled in the agency inventory and thought it'd be great when a customer calls in to pull up their PC number via username then click on a DameWare link.  This has been a problem as the website runs under the system account so any server-side calls stay within the system account and give GUI.  Today I found a gem on the Internet.  The little program is named DareCup.  Double-click on the installer and it asks where your DameWare Remote Control software is, copies the darecup.exe file to the folder, then writes two registry entries which add a Protocol Handler.  The handler works with both Internet Explorer and Chrome.  I had to manually go into the Chrome Protocol Handler section (even though there were no entries), close the menu, then it worked.  When writing code, simply place a <a href=rc://computername>DameWare</a> and the handler redirects the call to DameWare which opens the GUI.  You can even go so far as to enter your username and password plus RDP protocol if you wish.

Here's the article I was reading when I found the link:
http://community.spiceworks.com/how_to/show/1794-dameware-mini-remote-spiceworks-integration

and some instructions from the site.  The DareCup download also comes with instructions and a code sample.
rc:// -The DareCup URL Handler
#{ip_address} -variable from Spiceworks/Dynamic Troubleshooting Action Link (#{name} could also be used instead of #{ip_address})
username=YOUR_USERNAME -username for Dameware
password=YOUR_PASSWORD -password for Dameware
domain=YOUR_DOMAIN -domain for Dameware
Monitor=viewonly -starts Dameware in view only mode
Connectiontype=autoconnect -attempts to automatically connect when started
Closeondisconnect=autoclose -when disconnecting it closes Dameware

Here's an example of how I use this utility to open a DameWare connection via weblink:

<a title='Dameware' href='rc://targetcomputer>?domain=MyDomain&username=MyUserName&password=MyPassword&connectiontype=autoconnect&Closeondisconnect=autoclose&-a:1'><img style="margin:0px 0px 0px 5px;vertical-align:text-top;" src=/images/dw.png width=17></a>

Note that I've added a -a:1 to the end of the GET method.  Even though DareCup doesn't know what it means, it still accepts the variable and passes it to DameWare for processing.  The -a stands for Authentication and type 1 means authenticate via NT Challenge (Active Directory/Windows SAM).

To use:
* Download the DareCup zip package and extract.
* Using your admin account, install DareCup.  It will ask where your DameWare Remote software is located.
* When finished, your web browser will redirect RC:// calls to the DareCup application.  In Chrome, it'll pop up with an external Protocol prompt:


Saturday, February 22, 2014

PowerShell: Downloading SCCM 2012 ReportServer Report CSV's

The SCCM 2012 Reports interface is cumbersome for quickly pulling information together.  Instead, I updated my SCCM 2007 SQL server web-reporting technique.  I found it worked great and now can download reports as CSV's and use them in PowerShell scripts.

Here's an example:

invoke-webrequest "http://sccmserver/ReportServer?%2fConfigMgr_NR1%2fAsset+Intelligence%2fSoftware+02E+-+Installed+software+on+a+specific+computer&Name=$ComputerName&rs:Command=Render&rs:Format=CSV&rc:Toolbar=False" -credential $creds -outfile $destination 

This will download a report about all of the software loaded on one computer and place it into a CSV file.  All you'd have to do is $software = import-csv $destination 

Another example reports about all the software that starts when the computer is powered on:
iwr "http://sccmserver/ReportServer?%2fConfigMgr_NR1%2fAsset+Intelligence%2fSoftware+04C+-+Software+configured+to+automatically+run+on+a+specific+computer&Name=$ComputerName&rs:Command=Render&rs:Format=CSV&rc:Toolbar=False" -credential $creds -outfile $autodestination

A third example reports about what computers and IPs are currently on a subnet:

iwr -credential $creds "http://sccmserver/ReportServer?%2fConfigMgr_NR1%2fNetwork%2fIP+-+Computers+in+a+specific+subnet&variable=192.168.0.0&rs:Command=Render&rc:toolbar=false&rs:Format=CSV" -outfile $oursubnet

Here I get the network card information for a computer:
iwr -credential $creds "http://sccmserver/ReportServer?%2fConfigMgr_NR1%2fHardware+-+Network+Adapter%2fNetwork+adapter+information+for+a+specific+computer&variable=$ComputerName&rs:Command=Render&rc:toolbar=false&rs:Format=CSV&quo t; -outfile $NICDestination

A report about the users of a certain computer:
iwr -credential $creds "http://sccmserver/ReportServer?%2fConfigMgr_NR1%2fAsset+Intelligence%2fHardware+05A+-+Console+users+on+a+specific+computer&Name=$ComputerName&rs:Comm and=Render&rc:toolbar=false&rs:Format=CSV" -outfile $cache

A computer hardware report about a certain computer:
iwr -credential $creds "http://sccmserver/ReportServer?%2fConfigMgr_NR1%2fHardware +-+General%2fComputer+information+for+a+specific+computer&variable=$ComputerName&rs:Command=Render&rc:toolbar=false&rs:Format=CSV" -outfile $HWDestination

Disk information report about a certain computer:

iwr -credential $creds "http://sccmserver/ReportServer?%2fConfigMgr_NR1%2fHardware +-+Disk%2fDisk+information+for+a+specific+computer+-+Physical+disks&variable=$ComputerName&rs:Command=Render&rc:toolbar=false&rs:Format=CSV" -outfile $diskdestination


Wednesday, February 19, 2014

PowerShell: Netstat Established Connections List

This is a script which you can adapt to your needs.  I wanted to find the "Established" foreign computers and the programs which are talking to them.  PowerShell doesn't have a native tool (not that I'm aware of) so most use NetStat.  Here is the script I made that finds the remote host FQDN and converts the Process ID into a program name.  When finished, it displays a table but you can easily out-gridview if you'd like.

$Netstats = netstat -aof|select-string "active connections","Proto","\[::","Can not obtain" -notmatch|select-string "establish"
$process = get-process|select id,name

foreach($n in $Netstats){
$temp = $n.line.split(' ',[System.StringSplitOptions]::RemoveEmptyEntries)
$p = ($process|?{$_.id -like $temp[4]}).Name
$outcsv += write ($temp[2] + "," + $p + "`n")}
$Final = $outcsv|convertfrom-csv -header RemotePort,Program
$Final|ft -autosize

I'm sure you'll find it doesn't fit all your needs but should give you some insight on how to manipulate NetStat's output.

Reference:
Netstat
Get-Networkstatistics

Friday, February 14, 2014

PowerShell: Find Current Remote User Mapped Drives

I thought it would be simple to find someone's current drive mappings using PowerShell.  This wasn't the case.  When I used my credentials to remotely access the computer, it looked for the mapped drives of the credentialed user, not the current user.  After much research and testing, I found a solution that you can customize to your environment.  This script was tested in a Windows 7 Enterprise Active Directory environment using PowerShell 4.0 on the script side and PowerShell 2.0 on the client side.  Here is the script with explanations:

$computer = "remotecomputername"
$creds = get-credential

#Find the remote computer's current user and cut off the 
#domain part of the username
$user = (gwmi win32_computersystem -computer $computer -credential $creds).username.split('\')[-1]
#Query Active Directory using $user to find the users SID

$sid = (get-aduser $user).sid.value

#Run a remote script while inputting the user SID (variable at bottom of script)
invoke-command -computer $computer -credential $creds -scriptblock {
#Remote HKCU & HKLM are only loaded.  
#We're adding the HKEY_USERS key so we can query against it

set-location registry::\HKEY_USERS
New-PSDrive HKU Registry HKEY_USERS
Set-Location HKU:

#Find all mapped drive letters in the \network key
$drives = (gci -Path Microsoft.PowerShell.Core\Registry::HKEY_USERS\$($args[0])\Network -recurse)
#Read the RemotePath key from each mapped drive
$driveresults = foreach ($d in $drives){$q = ("Microsoft.PowerShell.Core\Registry::HKEY_USERS\$($args[0])\Network\" + $d.pschildname);get-itemproperty -Path $q;}
#You can manipulate the output to your needs and assign this whole invoke-command script to a variable for further formatting
$driveresults|Format-Table PSChildName,RemotePath -autosize -hidetableheaders} -argumentlist $sid