Monday, November 25, 2013

CMD: Install Windows 7 IP-based Printers via batch file

IT Departments debate over Server-based and IP-based direct printing.  I use IP-based printing as a way to lower WAN traffic, negate at least two points of failure, and speedup user response/print time.  Microsoft has developed some fine printer scripts they introduced in Windows XP.  They further polished these scripts in Windows 7 and placed them into their own printing_admin_scripts subfolder.  I'm sharing my sample script and giving a quick explanation of each command.  For more details about the Microsoft VB script switches, visit Microsoft's TechNet site or use Notepad to read the syntax notes placed inside each VBS file.

REMARK                   --- Start of Script ---

REMARK Added a script title so I know what printer I'm installing

echo *** Installing Canon iPF720 Plotter ***

REMARK Remove old printer presence via PowerShell registry search

PowerShell "if (test-path 'hklm:\software\microsoft\windows NT\currentversion\Print\Printers\HP DesignJet 1050C Plotter'){cscript c:\windows\system32\printing_admin_scripts\en-us\prnmngr.vbs -d -p 'HP DesignJet 1050C Plotter'}"

REMARK Checking for processor type then installing appropriate driver
REMARK AMD64 works with all typical Windows useable 64-bit processors

if %processor_architecture% equ AMD64 (cscript c:\windows\system32\printing_admin_scripts\en-us\prndrvr.vbs -a -m "Canon iPF720" -h "\\server\share\Printers\Drivers\Canon iPF720\64-bit\Driver" -i "\\server\share\Printers\Drivers\Canon iPF720\64-bit\Driver\6WJF02M.INF") else (cscript c:\windows\system32\printing_admin_scripts\en-us\prndrvr.vbs -a -m "Canon iPF720" -h "\\server\share\printers\Drivers\Canon iPF720\Driver" -i "\\server\share\printers\Drivers\Canon iPF720\Driver\2WJF02M.INF")

REMARK Adding the IP port the new printer will use

cscript c:\windows\system32\printing_admin_scripts\en-us\prnport.vbs -a -r "CanoniPF720" -h 192.168.1.100 -o raw -n 9100

REMARK Putting the Friendly name, driver, and port together

cscript c:\windows\system32\printing_admin_scripts\en-us\prnmngr.vbs -a -p "Canon iPF720 Plotter" -m "Canon iPF720" -r "CanoniPF720" 

REMARK Added a 10 second pause so I can chain install scripts together yet still monitor each installation progress

timeout /t 10

REMARK                   --- End of Script ---

I also thought about adding an audible prompt when things go right or wrong.  This would lessen the need to physically watch the install but rather allow multitasking by listening out for the correct sounds after each install while performing other duties.

Friday, November 8, 2013

PowerShell: Invoke-RestMethod Decibel.Net Sample

I learned how to insert Headers into an Inoke-RestMethod request in order to pull music information from an online database.  Afterwards, I can insert the received objects into MP3 ID3 tags using methods mentioned in my previous posts (including album covers).  I recently started using Decibel for grabbing music information (even though indications are that they're going to a pay-only API).  As of now, they have a free version and two paid versions which allow more information about each query.  When you create a free account, you'll be requested to make an application.  I called my application "PowerShell."  The system generated an Application ID & Key.  New to me was having to pass this Application ID, Application Key, and Date/Time via a header request when making my PowerShell queries.  After many web searches and trying different script methods, I'm sharing my successful script:

#Replace the x's with your Applications information
#Using an artist like "Fine Young Cannibals" will search for artists
#that have any or all of those three words

$DAppID = "xxxxxxxx"
$DAppKey = "xxxxxxxxxxxxxxxxxxxxxxxxxxxxx"
[string]$DTimeStamp = get-date -format "yyyyMMdd HH:mm:ss"
$Artist = "Metallica"

#Decibel documention

#I requested all albums that have Metallica in the artists name field

$query = invoke-restmethod http://api.decibel.net/v1/albums?artist=$Artist `
-headers @{"DecibelAppID"=$DAppID;"DecibelAppKey"=$DAppKey;"DecibelTimestamp"=$DTimeStamp;} `
-method get

$result = $query.AlbumQueryResult.ResultSet.album

# I filtered for only Metallica album names

foreach ($r in $result){$r.Name|where-object{$r.Artists -eq $Artist}}

Thursday, July 25, 2013

PowerShell: Downloading CSV's from SCCM-SMS 2007 Reporting Websites

I needed to bundle the SCCM/SMS 2007 ConfigMgr web reporting results into PowerShell or Excel.  The SMS Web Reporting has a great export-to-CSV tool on each page but runs Java in the background and requires a confirmation click and a subsequent filename before being able to download the CSV file.  Once downloaded, it quickly becomes a PowerShell object via import-csv.  After lots of searching, I compiled a method to automatically download and save the CSV file so it can be used by PowerShell.


#Set the variables

$xhttp = $nul
$stream = $nul
$username = "domain\username"
$password = "password"
$url = 'http://sccmserver/SMSReporting_bob/Report.asp?ReportID=386&Name=MyPcName'
$destination = "c:\users\myname\desktop\MyPcName.csv"

#Start XML

$xhttp = new-object -com msxml2.xmlhttp

$xhttp.open("Post",$url,$false,$username,$password)

$xhttp.setrequestheader("Content-Type","application/x-www-form-urlencoded")

#this sends the request to perform a CSV export

$xhttp.send("export=yes")

#This line's not needed but I use it to get confirmation
#that the download is queued correctly.  If not OK then
#I know to check the above part of this script

$xhttp.statustext

#Now grab the file in the buffer and save it to disk

$stream = new-object -com ADODB.Stream

$stream.open()

$stream.type = 1

#Connect the buffer to the downloaded file

$stream.write($xhttp.responsebody)

$stream.savetofile($destination,2)

$stream.close()

$stream = $nul

References:
http://myitforum.com/cs2/blogs/jnelson/archive/2008/04/02/114527.aspx
http://www.greyhathacker.net/?p=500
http://scriptolog.blogspot.com/2007/08/query-http-status-codes-and-headers.html

Wednesday, March 20, 2013

PowerShell: Remove Computer Object from Active Directory (or modify object properties)


This technique bypasses the need to load the Active Directory module and has been tested in PowerShell 2.0 & 3.0.  The CN= reference can be either a computer or user.  This script connects to your domain and searches for an object you assign via the variable $oldcomp.  You can also change the objects properties once found in AD.  That's described in the second part of the script.

#Grab your local domain for ADSI

$searcher = [adsisearcher][adsi]""

#Create $oldcomp however you like then use it as input for the ADSI searcher

$searcher.filter ="(cn=$oldcomp)"

#Search Active Directory for the current location of the computer object

$searchparm = $searcher.FindOne()

#Assign $deleteoldcomp to the found path

$deleteoldcomp = $searchparm.path

#Assign the ADSI object to a variable

$delcomp = [adsi]("$deleteoldcomp")

#I used the Try/Catch sequence in case the computer wasn't found in AD.
#the deletetree() removes the object from the domain, not the computer 
#itself.  Stop here if you only want to find the object and then edit its 
#properties.  If you wish to delete it, then add this next line:

try {$delcomp.deletetree()}catch{}

After you have found the computer object, you are able to edit its properties.  If you take the $delcomp object and type $delcomp|format-list * then you'll see information about your object.  To change your computer object properties:

#To change the computer description property

$delcomp.description = [string]"Whatever String Value you want"

#To assign a technician in the ManagedBy property, copy/paste the 
#technicians user object

$delcomp.managedby = "CN=TechnicianUserID,OU=..."

Use the same technique to assign other property values.  When you are finished, you'll need to save your changes back to the computer object.  Ensure your account has the correct credentials.

$delcomp.setinfo()


Wednesday, March 13, 2013

Futurology: Weaning Humans Off Death

This stunning illustration summarizes how death occurred during the 20th century.  With numerous advances in the medical/technological fields, we'll see a vast reduction of health-based deaths in the 21st Century.  Already there are great strides taken to create 3D printed replacement tissue and organs.  We can convert skin cells into stem cells and use them to repair body components.  Combined with technological breakthroughs with nanobiotics, the likelihood of dying from "natural" causes will dwindle as the century advances on.  It is my hope that these advances will motivate societies to quit destroying each other (or themselves) and focus on humanity and the advancement of it.

Visit Data is Beautiful for more information about this chart.

Sunday, March 10, 2013

Hardware: Self-healing Circuit Boards

Phys.org has a great article about an awesome Cal-Tech breakthrough:  Self-healing circuit boards. Capacitors, resistors, and other electronics will be able to recover from power spikes or brown-outs, getting wet, over heated, or any other type of injury capable of ruining your device or system.  All we need is artificial intelligence (Watson anyone), and a self-sustaining power source and these entities will be our Frankenstein creatures!  What can possibly go wrong?  (/end tangent)

Can you imagine the crossover abilities of incorporating this technology into the biological 3D printer advancements?  Creating self-healing human body parts via nanobots.  Wow, exciting times lie ahead for both humans and their electronic companions.


A quote from the Phys.org article:
"It was incredible the first time the system kicked in and healed itself. It felt like we were witnessing the next step in the evolution of integrated circuits," says Ali Hajimiri, the Thomas G. Myers Professor of Electrical Engineering at Caltech. "We had literally just blasted half the amplifier and vaporized many of its components, such as transistors, and it was able to recover to nearly its ideal performance."

Read more at: http://phys.org/news/2013-03-caltech-self-healing-electronic-chips.html#jCp

Interfaces: New Advances

On May 13th, 2013, Leap-Motion begins selling their new computer interface which will boost Windows 8's market share.  There's no surprise Microsoft envisioned a touch-based interface when designing Metro.  Where Microsoft went wrong is not taking advantage of their XBOX360 Kinect product.  They missed an opportunity to lead the market on gestural input designs.  Instead, developers hacked the product and created their own solutions.  Microsoft finally created an SDK but after the horse had bolted.  Microsoft should have bundled a Kinect-like device with Windows 8 and capture this new interface market.

Leap-Motion's fledgling company developed a simple, robust, and cheap device capable of accurately registering hand and finger movements.  I predict this device will expand and become a de facto interface integrated into the next generation of computers, phones, and other devices which would benefit from hands-free movement-based interactions.  Watch these two videos to get an understanding on how simple yet accurate the controller is and you'll agree how instrumental it'll be in future devices.  I'd love to see it embedded into Google-Glass.

Saturday, March 2, 2013

PowerShell: Music Files, Get-Hash, and creating filtered folders

As music files are collected, it can be found that some files will have exact names even though the songs may be different versions.  Another problem is getting exact duplicate songs with different file names.  I created a script which filters both scenarios and moves one file-hash-based copy of exact files to a new folder structure based on the Artist name -- leaving hash duplicates in the original folders.  If a second exact-named but not a hash-duplicate file attempts to move into the Artist's folder, the script makes a subfolder named after the files hash then moves the file to it.  

I've only tested this script using PowerShell 3.0.
Disclaimer: This script will create new folders and move files from their original location to new ones.  Script errors can result in misnamed files.

I'll explain more as we go over the script:

#Taglib is described in my previous blog
#Click here to learn how to install this ID3 tag utility

$taglib = "C:\PowerShell\taglib\libraries\taglib-sharp.dll"
[system.reflection.assembly]::loadfile($taglib)|out-null

#Select the destination root folder where you want 
#your processed files to go. Make sure to leave the
#trailing backslash

$destination = "e:\hash3\"

#The hashtable variable will gather all your music files from the 
#current folder and all subfolders and process their hash strings.
#Click here to learn how to install Get-Hash

$hashtable = gci -file -recurse -include *.flac,*.ape,*.ra,*.m4a,*.mp2,*.wma,*.mp3|get-hash

#We add a new Hashtable property for the incoming Artist object and
#assign an empty value "" as placeholder

$hashtable|add-member -membertype noteproperty -name Artist -value ""

#Now we select each file in the hashtable and resolve the 
#artists name.  If the file is not a valid music file, we
#write the error file name to the console and add it to a
#text file with other invalid files.

foreach ($a in $hashtable){

$fileperformers = $nul

$filealbumartists = $nul
$fileartist = $nul
$albumartist = $nul

#Here's the try/catch for the taglib which is trying to load
#the ID3 file values.  If it finds any ID3 errors, it'll move the file to 
#an "invalid Audio File"\hash-string subfolder.


try{
$media = [taglib.file]::create($a.path)
}
catch [exception]{
write-host -foregroundcolor "yellow" ($a.path + " - invalid audio file")
$a.path|out-file c:\powershell\hasherrors.txt -append
$fileartist = "Invalid Audio File"
if (!(test-path ($destination+$fileartist+"\"+$a.hash))){md ($destination+$fileartist+"\"+$a.hash+"\")}
move $a.path ($destination+$fileartist+"\"+$a.hash+"\")
}

#We pull the Artist name and filter brackets and untypical characters


$fileartist = $media.tag.performers
if ($fileartist){
$fileartist = $fileartist -replace ("\[","")
$fileartist = $fileartist -replace ("\]","")
$fileartist = $fileartist -replace ("[^0-9a-zA-Z-&\']"," ")
}

#Next we pull the Album Artist name and process it

$albumartist = $media.tag.albumartists
if ($albumartist){
$albumartist = $albumartist -replace ("\[","")
$albumartist = $albumartist -replace ("\]","")
$albumartist = $albumartist -replace ("[^0-9a-zA-Z-&\']"," ")
}

#We see if the performers tag was a real value
#if not, we try to use the album artist value
#if no performer or album artist value, we use "Unknown"

if (!$fileartist){$fileartist = $albumartist}
if (!$fileartist){$fileartist = "Unknown"}

#We enter the result into the added Artist object

$a.Artist =$fileartist
}

#We sort the resulting hash table by unique hashes
#this gives us a list of unique hashes, leaving duplicates
#behind

$hashtable = $hashtable|sort hash -unique


#We create new destination folders, check for exact file names
#in the new folders, and if exist, then create hash-named folders
#and place the file into it
#we also bypass error files which have already been moved

foreach ($h in $hashtable){
if (!(test-path $h.path)){continue}
if (!(test-path ($destination+$h.artist))){md ($destination+$h.artist)}

if ((test-path ($destination+$h.artist+"\"+$h.path.split('\')[-1]))){
md ($destination+$h.artist+"\"+$h.hash)
move $h.path ($destination+$h.artist+"\"+$h.hash)}

if (!(test-path ($destination+$h.artist+"\"+$h.path.split('\')[-1]))){move $h.path ($destination+$h.artist)}
}

Thursday, February 28, 2013

Facebook: Disable Notification Sound

Facebook recently implemented sounds when you receive a new notification.  It's akin to the Sonic the Hedgehog game checkpoint sound.  Click on the screenshot and follow the steps to disable this new sound.

Sunday, February 24, 2013

PowerShell: Get-Hash to filter file duplicates

You can find duplicate files and filter out one copy of each set into a new directory, leaving behind all the copies.  This is possible thanks to the PowerShell Community Extension modules PSCX get-hash cmdlet.

(Note: I've created a more extensive script utilizing get-hash and taglib.  Click here for a more comprehensive music filter technique)

1. Download the PSCX zipped folder and copy it's contents into your PowerShell modules folder ($env:psmodulepath).  I used version 3.0 to run in PowerShell 3.0.

2. Import-module pscx; careful using help.  I've had my shell lock up several times when asking for command help -- no matter the command. Run update-help to fix this problem.

3.  Go to a populated folder and type get-hash .\*.* to ensure the module and get-hash command are working.  You'll see path and hashstring objects for each file.

4.  Create a destination folder for your filtered files (i.e. e:\test\hash)

5. Run the following command from the root of the folder structure you wish to examine.

getchild-item -file -recurse|get-hash|sort hashstring -unique|%{move $_.path e:\test\path}

#BTW the -file option for GCI is new for PowerShell 3.0 otherwise you'd
#have to put in the |?{!$_.psiscontainer}| section after the gci to exclude
#subfolders

You now have one copy of each file in your new filtered folder.  All other copies are left in their original locations.

Obviously you can alter the command line to create subfolders, move based on various properties, etc., but basically your work is done.

If you have problems with duplicate file names when moving them to the new folder, you can have your filename duplicates create subfolders based on their hashstring, which will be unique, and be placed into them.

if ((gci -ea 0 e:\test\hash\($_.path('\')[-1]))){md -ea 0 e:\test\hash\$_.hashstring;move $_.path e:\test\hash\$_.hashstring}

PowerShell: Create contractions or input apostrophes

If you've ever needed to recreate contractions due to aprostrophe's being stripped from values or filenames, then read on:

Download my contractions.csv file (Thank you Enchanted Learning)

The contractions.csv has three columns to suit your needs.  Column one is the root words used to create the contraction.  Column two is the contraction without the apostrophe.  Column three is the resulting contraction.

$contractions = import-csv "c:\powershell\contractions.csv" -header ("Words","NoApostrophe","Contraction")

# I've assigned $file with a file name missing an apostrophe

$file = gci "it s a gas".txt

#Now we read each row of the CSV file searching for the word combination needed 
#to add an apostrophe to the name.  Once found, assign a new filename variable, save the file
#with the new name and break out of the loop


foreach($c in $contractions){if ($file.name -like ("*" + $c.noapostroph
e + "*")){
$newfile = $file.name.replace($c.noapostrophe,$c.contraction);ren $file $newfile;break}}


#to rename a variable string value:


$songtitle = "it s a gas"


foreach($c in $contractions){if ($songtitle -like ("*" + $c.noapostrophe + "*")){$songtitle = $songtitle -replace ($c.noapostrophe,$c.contraction);break}}


Seeding the Universe: Jason Silva

I am constantly amazed by this man's recollection of his readings. He quotes paragraphs and intertwines them with his visions epitomizing a euphoric video experience that shouts "Epiphany!" Brilliant man. The amount of tangents they must have talked about during this hike.

Gerontology: Aubrey de Grey discussing his latest research


PowerShell: ID3 Tag Editing via Taglib-sharp.dll and Discogs API


First of all, I've been searching for a good way to read, manipulate, then write values to the ID3 and other extended file information properties.  TagLib is perfect.  It integrates easily into scripts and doesn't have any problems other than trying to read a wrongly-named MP3 file.  It'll throw an error and I haven't found a way of suppressing or sending the error value to a variable other than to set $erroractionpreference = ignore, which sets the action for the whole script.

(Note: I've created a new script using taglib and get-hash to filter out duplicate files.  Click here)

Getting started:
Download the latest taglib: http://download.banshee.fm/taglib-sharp/


Download the most current version and look for the taglib-sharp.dll file in the libraries folder.


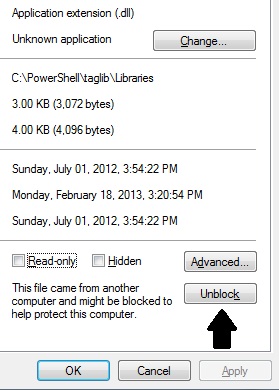
Windows 7+ has security protecting the system from "foreign" dlls.  Right-click on the taglib-sharp.dll file and click on the "unblock" button.  This will allow you to load the file into PowerShell.


#Create a variable for the tag-lib dll file

$taglib = "C:\PowerShell\taglib\libraries\taglib-sharp.dll"

#Load it into Powershell

[system.reflection.assembly]::loadfile($taglib)

#Find an MP3 and either assign it to a variable or put it's name into the create field


$media = [taglib.file]::create("e:\test\body.mp3")

#Now you can view, edit, and save ID3 information

PS E:\test> $media.properties
Codecs          : {TagLib.Mpeg.AudioHeader}
Duration        : 00:05:12.3120000
MediaTypes      : Audio
Description     : MPEG Version 1 Audio, Layer 3
AudioBitrate    : 128
AudioSampleRate : 44100
BitsPerSample   : 0
AudioChannels   : 2
VideoWidth      : 0
VideoHeight     : 0
PhotoWidth      : 0
PhotoHeight     : 0
PhotoQuality    : 0


Compare Taglib field entries to Windows Explorers Detail tab:
PS E:\test> $media.tag
StartTag                   : TagLib.NonContainer.StartTag
EndTag                     : TagLib.NonContainer.EndTag
TagTypes                   : Id3v1, Id3v2
Tags                       : {, }
Title                      : Body
Performers                 : {Bush}
PerformersSort             : {}
AlbumArtistsSort           : {}
AlbumArtists               : {Bush}
Composers                  : {Gavin Rossdale}
ComposersSort              : {}
TitleSort                  :
AlbumSort                  :
Album                      : Sixteen Stone
Comment                    :
Genres                     : {Alternative}
Year                       : 1994
Track                      : 6
TrackCount                 : 0
Disc                       : 1
DiscCount                  : 1
Lyrics                     :
Grouping                   :
BeatsPerMinute             : 0
Conductor                  :
Copyright                  :
MusicBrainzArtistId        :
MusicBrainzReleaseId       :
MusicBrainzReleaseArtistId :
MusicBrainzTrackId         :
MusicBrainzDiscId          :
MusicIpId                  :
AmazonId                   :
MusicBrainzReleaseStatus   :
MusicBrainzReleaseType     :
MusicBrainzReleaseCountry  :
Pictures                   : {}
IsEmpty                    : False
Artists                    : {Bush}
FirstArtist                : Bush
FirstAlbumArtist           : Bush
FirstAlbumArtistSort       :
FirstPerformer             : Bush
FirstPerformerSort         :
FirstComposerSort          :
FirstComposer              : Gavin Rossdale
FirstGenre                 : Alternative
JoinedArtists              : Bush
JoinedAlbumArtists         : Bush
JoinedPerformers           : Bush
JoinedPerformersSort       :
JoinedComposers            : Gavin Rossdale
JoinedGenres               : Alternative

PS E:\test> $media.properties.duration
Days              : 0
Hours             : 0
Minutes           : 5
Seconds           : 12
Milliseconds      : 312
Ticks             : 3123120000
TotalDays         : 0.00361472222222222
TotalHours        : 0.0867533333333333
TotalMinutes      : 5.2052
TotalSeconds      : 312.312
TotalMilliseconds : 312312

#An example of how I load variables from my music files

$filename = $file.basename
$fileextension = $file.name.split('.')[1]
$filetitle = $media.tag.title
$fileperformers = $media.tag.performers
$filealbumartists = $media.tag.albumartists
$filealbum = $media.tag.album
$filegenres = $media.tag.genres
$fileyear = $media.tag.year
$filetrack = $media.tag.track
$filetrackcount = $media.tag.trackcount
$fileaudiobitrate = $media.properties.audiobitrate
$fileconductor = $media.tag.conductor
$filecomposers = $media.tag.Composers
$fileBPM = $media.tag.BeatsPerMinute

$filedurationminutes = $media.properties.duration.minutes
$filedurationseconds = $media.properties.duration.seconds
$filedurationtotalseconds = $media.properties.duration.totalseconds


#Here's a way to clean the title tag. It cleans the annoying buggy brackets
#then it restricts all characters except the ranges inside the brackets
#Lifted clip explaining some regex expressions:


# Expression:
# ([0-9a-zA-Z\.]+) --> Gets all chars, numbers and '.'. Discard comma and others.


if ($filetitle){
$filetitle = $filetitle -replace ("\[","")
$filetitle = $filetitle -replace ("\]","")
$filetitle = $filetitle -replace ("[^0-9a-zA-Z-&\']"," ")}


#inserting Album Photo:
#(requires PowerShell 3.0 for this album photo catching section)
#To populate the picture tag, I call upon Discogs API via Invoke-Restmethod
#Please refer to the Discogs developer pages for information how to search for your music
#In this example, I used the weighted results and select the first hit for my album search

$filealbum = $media.tag.album
$apialbum = $filealbum -replace (' ','%20')
$albumfound = (invoke-restmethod http://api.discogs.com/database/search?title=$apialbum).results[0]
$thumb = $currentfolder + "\" + $albumfound.thumb.split('/')[-1]
invoke-webrequest -uri $albumfound.thumb -outfile $thumb
$pic = $pic + [taglib.picture]::createfrompath("$thumb")

#writing back to the file

$media.tag.title = [string]$filetitle
$media.tag.performers = [string]$fileperformers
$media.tag.albumartists = [string]$filealbumartists
$media.tag.album = [string]$filealbum
$media.tag.genres = [string]$filegenres
$media.tag.year = $fileyear
$media.tag.track = [string]$filetrack
$media.tag.trackcount = [string]$filetrackcount
$media.tag.conductor = [string]$fileconductor
$media.tag.composers = [string]$filecomposers
$media.tag.BeatsPerMinute = [string]$filebpm
$media.tag.pictures = $pic
$media.save()

References:
http://www.powershell.nu/2009/09/04/scripting-mp3-metadata-through-powershell/
http://vallery.net/2012/04/27/organizing-your-music-with-powershell/


Monday, February 18, 2013

PowerShell: Invoke-RestMethod, API's, and your music collection

Gathering ID3 tag information for your music files has become easier by embracing PowerShell 3's Invoke-RestMethod (IRM) command.  Many online databases use Application Programming Interfaces (API's) for developers to access their information.  These API's used to use XML but now have moved to the JSON language. IRM embraces JSON and allows us to create these API connections and query information about our music files.  In this article, I'm accessing Discogs Creative Commons open-source database.
Original Extended File Information
Updated after IRM and Discog's API

In my earlier article, I explained how to access shell.application in order to retrieve the extended file properties we use to rename and organize our files.  Combined with this method, we'll grab the extended file information and use it to find the correct file information and insert it into our files.  One point to make is that the API wants exact query information.  You'll receive no information if searching for an artist name of Quean instead of Queen.

 Syntax for Discogs allows us to search for song titles, artist names or IDs, album names and their release data plus much more.  The following demonstration script is fragile and incomplete.  It's to show how we embrace the power of PowerShell 3's Invoke-RestMethod.  Become familiar with IRM and API's to pull in online information into your scripts. It'll enhance the CURRENT information you're capable of accessing.  I'm really liking PS3's capabilities.

Disclaimer: Use this script at your own risk!  You'll be accessing Discogs live database and manipulating your computers music files.  This script uses the Windows 7 extended file information numbers.

##Start Script

$shell = new-object -com shell.application
$dirname = (get-item .\).fullname

#A quick and dirty way to find a song to use.  Run your script from your music folder

gi .\*.mp3
write "Type the exact (case-sensitive) song title you wish to query"
$fileinput read-host
$filename = gi .\$fileinput.mp3|?{(!($_.psiscontainer))}|foreach-object{$_.name}
$shellfolder = $shell.namespace($dirname).parsename($filename)

#now you can retrieve the extended file information and use those objects for your queries

$songtitle = $shell.namespace($dirname).getdetailsof($shellfolder,21)
$contribartist = $shell.namespace($dirname).getdetailsof($shellfolder,13)
$albumartist = $shell.namespace($dirname).getdetailsof($shellfolder,217)
$album = $shell.namespace($dirname).getdetailsof($shellfolder,14)
$genre = $shell.namespace($dirname).getdetailsof($shellfolder,16)
$year = $shell.namespace($dirname).getdetailsof($shellfolder,15)
$track = $shell.namespace($dirname).getdetailsof($shellfolder,26)
$length = $shell.namespace($dirname).getdetailsof($shellfolder,27)
$bitrate = $shell.namespace($dirname).getdetailsof($shellfolder,28)
$conductors = $shell.namespace($dirname).getdetailsof($shellfolder,17)
$bpm = $shell.namespace($dirname).getdetailsof($shellfolder,218)
$composers = $shell.namespace($dirname).getdetailsof($shellfolder,219)

#An example of how to replace spaces for your online queries. %20 is the variable used for space.

$apicontribartist = $contribartist -replace (' ','%20')
$apisongtitle = $songtitle -replace (' ','%20')

#Every artist in their database has an ID.  We query to find the ID.

$artistid = (irm http://api.discogs.com/artist/$apicontribartist).resp.artist.id

#We use the Artist ID to find the song's original release date.  Master is the keyword for original recording.

if ((invoke-restmethod http://api.discogs.com/database/search?artist=$artistid"&"type=master"&"title=$songtitle).results){
$origdate = ((invoke-restmethod http://api.discogs.com/database/search?artist=$artistid"&"type=master"&"title=$songtitle).results.resource_url|select -unique -first 1|%{invoke-restmethod $_}).year}else{
$origdate = ((invoke-restmethod http://api.discogs.com/database/search?artist=$apicontribartist"&"track=$songtitle).results.year)|sort|select -first 1}

#Locate Original Album hosting the audio track by using the 
#artist ID, releases, master, and date.

$master = ((irm http://api.discogs.com/artists/$artistid/releases).releases|?{$_.year -eq $origdate -and $_.type -eq "Master"})
$master = $master[0]
$origalbum = (irm $master.resource_url).title

#Now we can use the master album the song appeared on to find additional song information
#We find track number, released on Vinyl, 45, CD, etc., and I like to combine the styles and genres 
#& is a reserved PowerShell character.  We wrap it "&" so it will be passed to Discogs.

$origtracknumber = 1 + (((irm ((irm http://api.discogs.com/database/search?artist=$apicontribartist"&"title=$origalbum"&"track=$songtitle"&"year=$origdate"&"type=master).results).resource_url).tracklist|?{$_.title -eq $songtitle}).position.count)
$origformat = ((irm http://api.discogs.com/database/search?artist=$apicontribartist"&"title=$origalbum"&"track=$songtitle"&"year=$origdate"&"type=master).results)
$origformat = ((irm http://api.discogs.com/database/search?artist=$apicontribartist"&"title=$origalbum"&"track=$songtitle"&"year=$origdate"&"type=master).results).label|select -first 1
$origstyles = (irm ((irm http://api.discogs.com/database/search?artist=$apicontribartist"&"title=$origalbum"&"track=$songtitle"&"year=$origdate"&"type=master).results).resource_url).styles
$origgenres = (irm ((irm http://api.discogs.com/database/search?artist=$apicontribartist"&"title=$origalbum"&"track=$songtitle"&"year=$origdate"&"type=master).results).resource_url).genres

#I combined the styles and genre information so I can create better
#future genre searches.

$origgenre = ($origstyles + $origgenres)|sort

#write the updates back to the original file
#Try taglib for inserting tags back into your audio file.
#Here's a site which goes over some of its abilities.
#For Windows 7, when you download taglib, find the taglib-sharp.dll
#file, right-click it, select properties, and "unblock" it so you can load 
#the DLL into your ref.assembly command

$taglib = "c:\powershell\taglib\libraries\taglib-sharp.dll"
[system.reflection.assembly]::loadfile($taglib)
$tags = [taglib.file]::create($filename)

#type $tags to see the file properties
#type $tags.tag to see the extended file properties
#I'll let you take it from here :-)
##End Script


Friday, February 15, 2013

PowerShell: Clean & Manage Music Files

Disclaimer: USE THIS AT YOUR OWN RISK! This script is made for Windows 7!  There will be file renaming and moving so TEST, TEST, TEST.  You can test this script by copying one folder of music into an empty folder then run the script in that folder.  It will only process the files in that folder.  If all goes well, all files will move into a new folder structure named Music on your desktop.

To run this or any other PowerShell script, you'll have to read up on the Get-Executionpolicy and Set-Executionpolicy as PowerShell disables scripts by default.

My previous article explained how to clean the extra "stuff" added to music file names.  This article further cleans those file names, gets rid of the troublesome [brackets], then uses the Genre, Artist, and Album information to create a new folder structure on your desktop.  You can then move it to wherever you store your music.


Here is an example of some files my friend wanted help managing:

Notice the brackets, curly brackets, and other special characters in the file names and properties.


This is the same folder of music files after running the script:
I performed a search for all files to display the name changes.  Notice the subfolder structure that each file is located in.  The left side is the Genre structure created based on the file information.

Three more notes before going through the script:  

  1. The script automatically ignores subfolders.  I strongly recommend you perform this move one folder at a time so you can ensure it worked properly.
  2. The script will process any type of file.  You'll have to create an -exclude in the top $filename variable if you want it to ignore JPG's, AVI's, and etc.
  3. Do not save this script to the folder you are processing. It will be moved into the Music folder and could cause problems.
## Start of Script

#We call the Shell Object

$shell = new-object -com shell.application

#Organized Music Folder Location
#You can change the location. The Music Root Folder defaults to your desktop

$MusicFolder = ($home + '\desktop\music')

#remove brackets from filenames per PowerShells bug with brackets

gci .\* |?{(!($_.psiscontainer))}|foreach{move -literalpath $_ ($_.name -replace ('\[|]','~'))}

#Set directory and file variables.  Add -exclude to the Get-Item if you want 
#to ignore other filetypes
#For instance: (get-item .\* -exclude *.avi,*.jpg)

$dirname = (get-item .\).fullname
$filename = (get-item .\*)|?{(!($_.psiscontainer))}|foreach-object{$_.name}

foreach($file in $filename){

#original filename holder, then split it to capture the extension and name only.

$fileholder = $file
$ext = ('.' + ($file.split('.')[-1]))
$noext = $file.trimend($ext)

#get Title (item number 21) property from the file

$shellfolder = $shell.namespace($dirname).parsename($file)
$title = $shell.namespace($dirname).getdetailsof($shellfolder,21)

#PowerShell filename bug for brackets. 
#If there's a bracket in the title, $title will equal nul

if ($title -like "*``[*" -or $title -like "*``]*"){$title = $nul}

#if the title isn't empty, replace the filename with it

if ($title -gt 0){$file = ($title + $ext)}

#clean extraneous characters from the filename
#BTW, let me know if you have a better way to filter files
#for now, I borrowed this filter technique:

$file2 = $file -replace ('^[0-100]','')
$file3 = $file2 -replace ('.mp33','.mp3')
$file4 = $file3 -replace (' - ','-')
$file5 = $file4 -replace ('   ',' ')
$file6 = $file5 -replace ('  ',' ')
$file7 = $file6 -replace ('\(','')
$file8 = $file7 -replace (':','')
$file9 = $file8 -replace ('\)','')
$file10 = $file9 -replace ('\/','')
$file11 = $file10 -replace ('\>','')
$file12 = $file11 -replace ('\<','')

#Split the filename at the hyphen and only keep the last portion
#since that's normally the song name

$file13 = $file12.split('-')[-1]

$finalfilename = $file13

#rename the file after all the modifications

ren -erroraction silentlycontinue -path ($dirname + '\' + $fileholder) -newname $finalfilename

$shellfolder = $shell.namespace($dirname).parsename($finalfilename)

#Filtering for Artist - Items 13 and 217

$contribartist = $shell.namespace($dirname).getdetailsof($shellfolder,13)
$albumartist = $shell.namespace($dirname).getdetailsof($shellfolder,217)

#filtering the Album Name - Item 14

$album = $shell.namespace($dirname).getdetailsof($shellfolder,14)
$album1 = $album -replace ('^[0-100]','')
$album2 = $album1 -replace ('.mp33','.mp3')
$album3 = $album2 -replace (' - ','-')
$album4 = $album3 -replace ('   ',' ')
$album5 = $album4 -replace ('  ',' ')
$album6 = $album5 -replace ('\(','')
$album7 = $album6 -replace (':','')
$album8 = $album7 -replace ('\)','')
$album9 = $album8 -replace ('\/','')
$album10 = $album9 -replace ('\>','')
$album11 = $album10 -replace ('\<','')

$finalalbumname = $album11

#filtering the genre name - Item 16

$genre = $shell.namespace($dirname).getdetailsof($shellfolder,16)
$genre1 = $genre -replace ('^[0-100]','')
$genre2 = $genre1 -replace ('.mp33','.mp3')
$genre3 = $genre2 -replace (' - ','-')
$genre4 = $genre3 -replace ('   ',' ')
$genre5 = $genre4 -replace ('  ',' ')
$genre6 = $genre5 -replace ('\(','')
$genre7 = $genre6 -replace (':','')
$genre8 = $genre7 -replace ('\)','')
$genre9 = $genre8 -replace ('\/','')
$genre10 = $genre9 -replace ('\>','')
$genre11 = $genre10 -replace ('\<','')

$finalgenrename = $genre11

#Deciding between Album and Contributing artist then cleaning the name

$artist = if ($contribartist -gt 0){$contribartist}else{$albumartist}
$artist1 = $artist -replace ('^[0-100]','')
$artist2 = $artist1 -replace ('.mp33','.mp3')
$artist3 = $artist2 -replace (' - ','-')
$artist4 = $artist3 -replace ('   ',' ')
$artist5 = $artist4 -replace ('  ',' ')
$artist6 = $artist5 -replace ('\(','')
$artist7 = $artist6 -replace (':','')
$artist8 = $artist7 -replace ('\)','')
$artist9 = $artist8 -replace ('\/','')
$artist10 = $artist9 -replace ('\>','')
$artist11 = $artist10 -replace ('\<','')

$finalartistname = $artist11

$filetrim = $finalfilename.trimend($ext)
$filedupeinsert = ($filetrim + 'DUPE')
$filedupe = ($filedupeinsert + $ext)


#move file based on its Genre, Artist, and Album

#Replacing Brackets for tildes

if ($finalgenrename -like "*``[*" -or $finalgenrename -like "*``]*"){$finalgenrename -replace ('\[|]','~')}
if ($finalalbumname -like "*``[*" -or $finalalbumname -like "*``]*"){$finalalbumname -replace ('\[|]','~')}
if ($finalartistname -like "*``[*" -or $finalartistname -like "*``]*"){$finalartistname -replace ('\[|]','~')}

#moving songs to folders

#If there's no Genre entry, a default is used
#For the sake of endless genre possibilities, I used this filter to group
#the various types.  Manipulate as you see fit:

if ($finalgenrename -like "*Rock*"){$finalgenrename = "Rock"}
if ($finalgenrename -like "*Alt*"){$finalgenrename = "Alternative"}
if ($finalgenrename -like "*Metal*"){$finalgenrename = "Metal"}
if ($finalgenrename -like "*Pop*"){$finalgenrename = "Pop"}
if ($finalgenrename -like "*Rap*"){$finalgenrename = "Rap"}
if ($finalgenrename -like "*Hip*"){$finalgenrename = "Hip-Hop"}
if ($finalgenrename -like "*R&B*"){$finalgenrename = "R&B"}

if (!($finalgenrename -gt 0)){$finalgenrename = "Genre"}

#If there's no Album entry, a default is used

if (!($finalalbumname -gt 0)){$finalalbumname = "Album"}

#Creating the desktop\music folder structure
#and moving files to their new folders

if (!(dir $MusicFolder\$finalgenrename -erroraction silentlycontinue)){md $MusicFolder\$finalgenrename -force}
if (!(dir $MusicFolder\$finalgenrename\$finalartistname -erroraction silentlycontinue)){md $MusicFolder\$finalgenrename\$finalartistname -force}
if (!(dir $MusicFolder\$finalgenrename\$finalartistname\$finalalbumname -erroraction silentlycontinue)){md $MusicFolder\$finalgenrename\$finalartistname\$finalalbumname -force}
if (dir $MusicFolder\$finalgenrename\$finalartistname\$finalalbumname\$finalfilename -erroraction silentlycontinue){move -erroraction silentlycontinue ($dirname + '\' + $finalfilename) -destination $MusicFolder\$finalgenrename\$finalartistname\$finalalbumname\$filedupe}else{move -erroraction silentlycontinue ($dirname + '\' + $finalfilename) $MusicFolder\$finalgenrename\$finalartistname\$finalalbumname\$finalfilename -force}
}

## End of Script

Click Here to view the list of Windows 7 file properties you can access via shell.application.